

If you’re a gamer, you know that having a comfortable and supportive gaming chair is crucial for long gaming sessions. However, over time, your chair may need maintenance, and you might need to disassemble it for repairs or cleaning. Disassembling a gaming chair might seem daunting, but it can be a simple process if you follow the right steps. In this article, we will guide you through the process How to Disassemble a Gaming Chair in easy-to-follow steps.
Why Disassemble a Gaming Chair?
There are several reasons why you might want to disassemble your gaming chair:
- To clean it thoroughly
- To replace or repair a broken part
- To modify the chair to suit your needs
- To move the chair to a different location
Whatever your reason, it’s essential to know how to disassemble a gaming chair correctly to avoid damaging the chair or injuring yourself.
Things to Consider Before Disassembling Your Gaming Chair
Before you start disassembling your gaming chair, there are a few things you should consider:
Safety Precautions When Disassembling a Gaming Chair
Disassembling a gaming chair can be hazardous if proper safety precautions are not taken. Here are some safety tips to keep in mind:
- Wear protective gloves to prevent injuries from sharp edges or screws.
- Disconnect the chair from the power source to prevent electrical shock.
- Keep children and pets away from the work area.
- Use a sturdy work table or surface to avoid the chair tipping over.
Required Tools
Make sure you have all the necessary tools to disassemble your gaming chair. These might include:
- Screwdriver (Phillips and flathead)
- Pliers
- Hammer
- Allen wrenches
- Lubricant spray
- Cleaning supplies
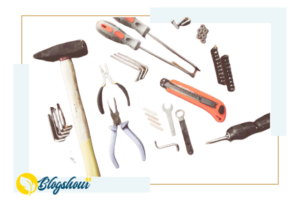
Check your chair’s instruction manual or manufacturer’s website to find out which tools you need.
Step-by-Step Guide How to Disassembling Gaming Chair
Follow these steps to disassemble your gaming chair:
Step 1: Gather the Required Tools
Collect all the tools you need and have them within reach.
Step 2: Prepare the Work Area
Choose a well-lit and spacious area to work in. Lay out a drop cloth or a clean surface to avoid losing small parts. If possible, work with a partner who can help you hold the chair steady.
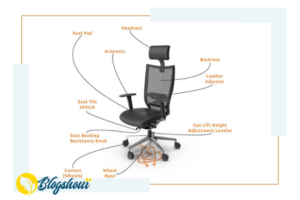
Step 3: Identify the Parts of the Chair
Take a look at the chair’s instruction manual or manufacturer’s website to identify the parts of the chair. Knowing which parts to remove and how to remove them will make the process easier.
Step 4: Remove the Wheels and Base
Flip the chair upside down and use a screwdriver to remove the casters or wheels. Next, remove the gas lift mechanism that connects the chair to the base.
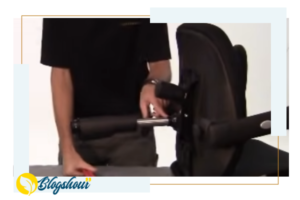
Step 5: Remove the Gas Lift and Armrests
Locate the screws that hold the armrests in place and remove them using a screwdriver. Lift the armrests off the chair. Then, remove the screws holding the gas lift in place and pull it out of the chair.
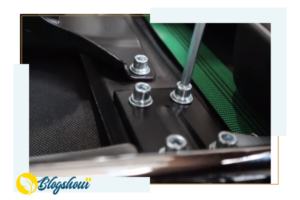
Step 6: Detach the Seat and Backrest
Remove any screws or bolts holding the seat and backrest in place. Lift the seat and backrest off the chair frame.
Tips for Reassembling Your Gaming Chair
As you disassemble your gaming chair, take note of how the parts fit together. This will help you reassemble the chair correctly. Before reassembling, clean and lubricate the parts to ensure smooth operation.
Common Problems When Disassembling a Gaming Chair and How to Solve Them
Sometimes, disassembling a gaming chair can present problems. Here are a few common issues and how to solve them:
Problem: Stuck Screws
If you encounter a screw that won’t budge, it could be because it’s rusted or stripped. Here’s what you can do:
- Try using a screwdriver with a better grip, such as one with a rubber handle.
- Apply some oil or penetrating lubricant to the screw to help loosen it.
- If the screw is stripped, try using pliers or a wrench to turn it.
Problem: Difficult Armrest Removal
Removing armrests can be tricky, especially if they are secured with bolts or screws. Here’s what you can do:
- Use an Allen wrench to remove the bolts or screws that secure the armrests to the chair.
- If the armrests are attached to the seat with clips, use a flat-head screwdriver to pry the clips off.
Problem: Gas Lift Won’t Budge
If the gas lift won’t come out of the chair, it could be because it’s stuck. Here’s what you can do:
- Apply some oil or lubricant to the gas lift to help loosen it.
- Use a hammer to gently tap the base of the gas lift to loosen it.
- If these methods don’t work, try using pliers to twist and pull the gas lift out of the chair.
Frequently Asked Questions
How long does it take to disassemble a gaming chair?
The time it takes to disassemble a gaming chair depends on the complexity of the chair and your experience with disassembling furniture. On average, it can take between 30 minutes to an hour to disassemble a gaming chair.
Do I need any special tools to disassemble a gaming chair?
No, you don’t need any special tools to disassemble a gaming chair. However, you will need a few basic tools such as a screwdriver, hammer, Allen wrench, and pliers.
Can I disassemble my gaming chair by myself?
Yes, you can disassemble your gaming chair by yourself as long as you have the necessary tools and follow the steps outlined in this guide. However, if you are unsure about any step or encounter any problems, it’s always a good idea to seek professional help.
Is it necessary to disassemble a gaming chair before moving it?
Disassembling a gaming chair can make it easier to move, especially if you have limited space. However, it’s not always necessary to disassemble a gaming chair before moving it. If you have enough space and help, you can move the chair as is. Just make sure to take extra care to avoid any damage to the chair or surrounding areas.
Conclusion
Disassembling a gaming chair may seem like a daunting task, but with the right tools and knowledge, it can be done quickly and easily. Remember to take your time and follow the steps outlined in this guide to avoid any problems. By doing so, you’ll be able to disassemble your gaming chair with ease and move it to a new location or store it away until you’re ready to use it again.
